The foundation is the most critical part of any building, and mathematically, it is also the most error-prone part of a manual estimate.

Solvin Babu
Founder of Griham
Featured

The foundation is the most critical part of any building, and mathematically, it is also the most error-prone part of a manual estimate.
When contractors measure trench lengths and masonry volumes using traditional Excel sheets, the most common mistake is double-counting the corners and junctions. If two walls meet at a T-junction, the overlapping volume in that corner often gets calculated twice—once for the horizontal wall, and once for the vertical wall.
This oversight forces you to over-order earthwork labor, PCC, and rubble, silently eating into your project’s profit margins before you even reach the plinth level.
At Griham.io, we eliminated this problem by building the Smart Centre-Line Method directly into our Strip Foundation Grid. You simply input your architectural dimensions, and our engine automatically calculates the complex geometric deductions.
Here is a detailed breakdown of exactly how to use the Strip Foundation Grid and what each input field means.
Understanding the Input Fields
All dimensions in the Griham.io Takeoff Wizard must be entered in Meters (m).
1. Description
This is simply your label for the structural segment. Good practice is to group similar walls together (e.g., "Main Outer Walls", "Inner Partition Walls", "Porch Foundation").
2. CL Len (L) - Centre-Line Length
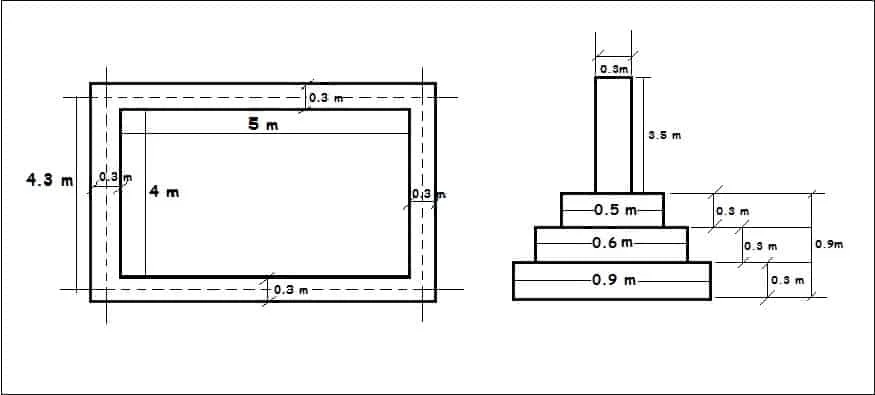
Instead of calculating outer and inner wall lengths separately, you enter the total Centre-Line length of the connected walls. The Centre-Line is the imaginary line running exactly down the middle of the foundation trench.Here total length of dotted line is the centre line length.
3. T-Junc - Number of T-Junctions
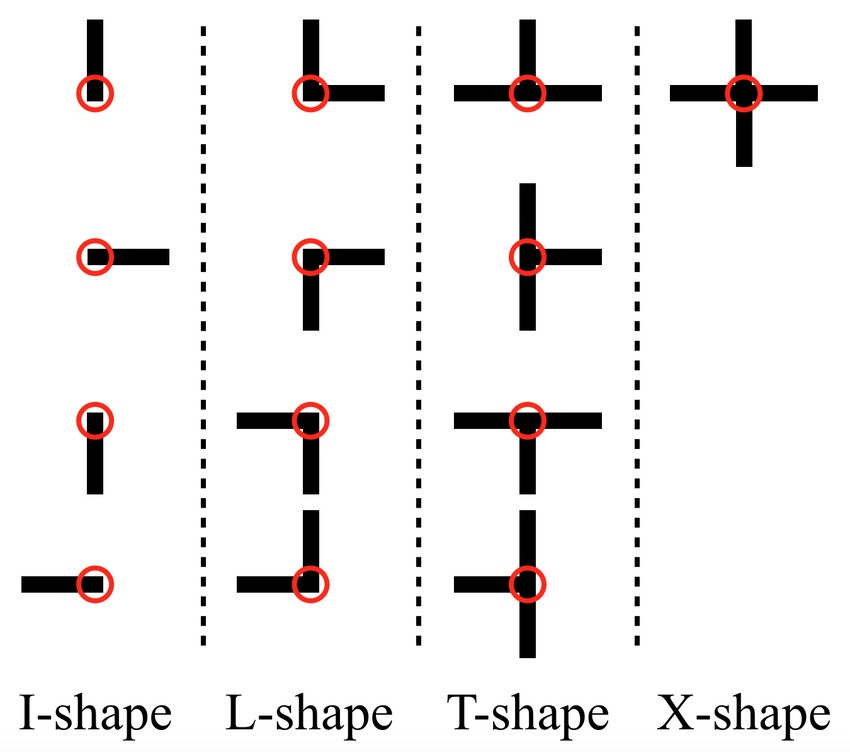

This is where the engine's magic happens. A "T-Junction" is where one wall meets the side of another wall, forming the shape of a 'T'.
Why we need this: At every T-Junction, the materials overlap by exactly half the width of the trench. When you tell Griham how many T-Junctions exist in your plan, the engine automatically runs the deduction formula:
-(Width / 2) × Number of T-Junctionsfor every volume calculation.
4. + Junc - Number of Cross-Junctions
A "Cross-Junction" occurs when two walls intersect each other completely, forming a '+' shape (like a cross).
Why we need this: At a cross-junction, the overlap is the full width of the trench. The engine automatically deducts
-(Width) × Number of Cross-Junctionsto ensure zero material overlap in your final BOQ.
5. Tr. W - Trench Width
This is the total width of the earthwork excavation. It is also the width used to calculate the volume of your PCC (Plain Cement Concrete) base layer.
6. Exc. D1 - Excavation Depth
The total depth of the trench from the existing ground level down to the hard strata. The engine multiplies your effective Centre-Line length by the Trench Width (Tr. W) and this Excavation Depth (Exc. D1) to calculate your total Earthwork Excavation volume in cubic meters (m³).
7. PCC D2 - PCC Base Depth
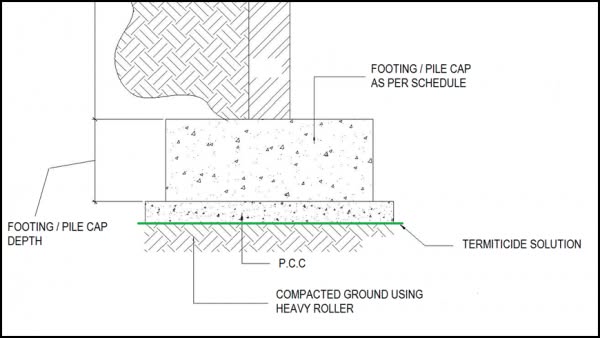
This is the thickness of your bottom concrete leveling course (usually 1:4:8 mix). For example, if your PCC layer is 15cm thick, you would enter 0.15. The engine automatically extracts this specific layer's volume from the trench to price your concrete accurately.
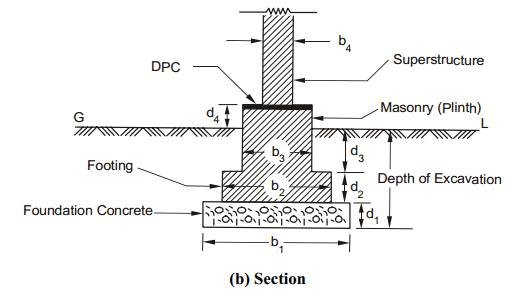
8. Mas. W2 - Masonry Width
Once the PCC is laid, the actual Random Rubble (or brick) foundation begins. This masonry is usually narrower than the trench itself. Enter the width of the stone/brick masonry here. The engine uses this narrower width to recalculate the Centre-Line deductions specifically for the masonry phase.in the image b3 is the width
9. Mas. D3 - Masonry Depth
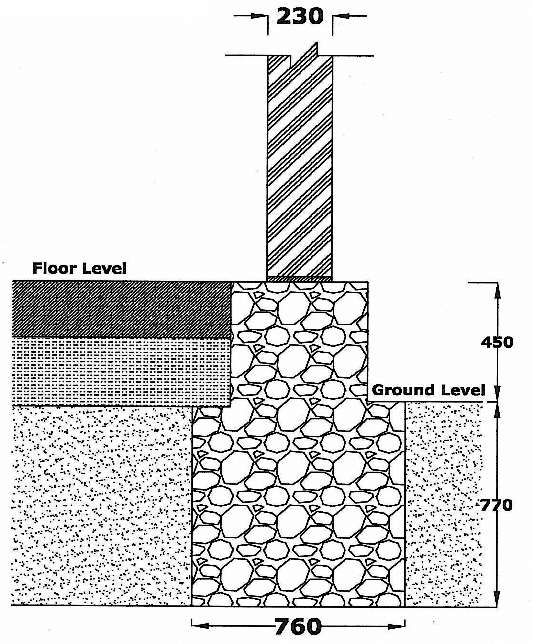
This is the total height of the foundation masonry resting on top of the PCC base.in the image Masonry depth is 450 + 770 = 1220
10. Waste % - Wastage Percentage
Site realities dictate that no material is used with 100% efficiency. Rubble breaks, and trenches collapse slightly. This column defaults to 5%, meaning the engine will calculate the exact mathematical volume and then add a 5% buffer to the final BOQ quantity to protect you against site shortages. You can easily adjust this to 0% for pure theoretical volumes, or higher for difficult site conditions.
What Does the Engine Generate?
Once you fill out this single row, you don't need to do any more math. By clicking "Calculate & Add to Staging", the engine instantly generates four perfectly precise items for your BOQ:
Earthwork Excavation (m³): Adjusted for all T and Cross junctions.
Earth Filling (m³): Automatically calculates the estimated backfill required for the basement area.
Plain Cement Concrete (m³): The exact volume for the base layer.
Random Rubble Masonry (m³): The exact volume of the stone foundation, using its own distinct width and height dimensions, fully deducted for overlaps.
Estimate with Confidence
The Strip Foundation Grid guarantees that you will never over-order foundation materials due to corner-counting errors again.
By feeding your 2D plan data into the Parametric Engine, you protect your profit margins from the ground up.
Ready to move on to the next step? Read our guide on [Step 2: Column Footings & RCC Calculations].


